Devlog 1: Research
Introduction
Hey there, and welcome to the first of many devlogs logging our weekly progress on our upcoming project!
We will start off with an introduction of the team. First, we have Jef Belmans and Jentl Vandorpe, both of whom will be working as programmers and will be responsible for developing and implementing the technical aspects of the project.
Next, we have three artists, Sina Ladage, Gwynne Aloy, and Xander Van Wassenhove. They will be working closely with the programming team to create the visual assets and design elements that you will see later in our game.
For the coding part of our project, we knew that we needed to establish a solid foundation before we could begin the prototyping process. We asked ourselves some basic questions about the game mechanics, user experience, and technical requirements. These questions included: What platform will the game be built on? Will we be using forward or deferred rendering? What Integrated Development Environment will we be using?
As for the art part of our project, we want to introduce a solid art-style and -direction to our game. Before we start on that however it is most important to focus on the game design aspect of everything. Therefore, we ask ourselves questions like: What experience do we want our players to have? What elements could enhance our gameplay? What about this idea feels most exciting and how can we evaluate on that?
Elevator pitch
Ghosts are going about their regular business inside their house, throwing raves, spooking the locals and playing with the neighbors dog. After the complaints from the locals kept coming in, two exorcists have been sent to cleanse the house of all that is evil. By taking the ghosts most valuable belongings and cleansing them, per a ritual, the exorcist duo can free the neighborhood of these ghosts once and for all. The ghosts, however, are obviously having none of it. They’ll do everything in their might to stop the exorcists from cleansing that lovely crib of theirs.
Coding
Engine
Unity or Unreal?
Picking the right game engine to power your game defines its development like a kid choosing to be a Disney channel or Nickelodeon fan defines its development as a human. Which game engine you pick defines not only the looks of the end product but also has a big impact on workflow and development. Some game engines thrive in 2D development while at the same time being a real pain in the a-hole when trying to get a 3D mesh to move and behave correctly in a simple scene. So we sat down and got our brain juices flowing.
When we sat down, the first thing we could fairly quickly agree upon is that we’d be waging Unreal Engine 5 against Unity 2022 as our engine of choice. Both developers have prior experience in both engines and were able to weigh in with their experiences. Some of us then went to the internet to get a general idea of the pros and cons of both engines. And with all that information and knowledge, we started to pitch the two against each other.
Jef has had good experiences with both engines but also sees which is best suited for a certain project. Our game will most likely be a local-multiplayer, non-spiltscreen party game with a stylized low-poly art direction, something very important to keep in mind when picking our engine. Unity is well known for being an indie-friendly engine for small to medium projects, whilst Unreal is known for its stunning visuals and expandability for enormous games. Unreal does make it a breeze to prototype a game rather quick with its visual scripting (blueprints) and lots of prototype ready assets like a fully working player controller. Unity does have a bigger user base than Unreal and this is reflected in the vast amount of questions and answers you can find on different fora all over the internet. The Unity documentation is also leaps and bounds ahead of that of Unreal. Unreal has a lot of vague, sometimes not even helpful at all, pages in its documentation. Probably the most important pro of Unity is its development and efforts of implementing tools and systems into its engine to make it easy to develop local-multiplayer games. The new input system is a prime example of that, setting up controls for multiple input devices (controllers, keyboard & mouse, touchscreen,…) and joining multiple players in a single game has never been easier. Trying to set up local-multiplayer inside Unreal, is a whole other story. Besides this, Jef also has lots of assets and plugins for Unity that increase development and improves the workflow.
Verdict
It’s the last two arguments that really convinced our group to go with Unity. The local-multiplayer is a very big part of our game, so picking an engine that’s geared towards this type of game will aid a lot in the process of developing our game.
Pipeline
Due diligence
We did our due diligence before getting hands-on in Unity, trying to figure out which render path might be best suited for our project. Jef asked his Graphics Programming teacher which render path the industry of today prefers. The short answer, deferred rendering. The long answer, forward rendering has some serious limitations when it comes to real-time lighting.
Lighting calculations in the Forward render path don’t come cheap, which is something important to be considered when you are thinking about developing a game with a lot of dynamic lights. Unity limits the amount of lights that can illuminate a single object in the forward renderer to 9 lights per object. This doesn’t mean that the deferred renderer should always be preferred over the forward renderer, as it comes with it’s own limitations.
Semi-transparent objects are impossible to render using the deferred renderer. Unity works around this by using the forward renderer to render transparent objects. Deferred rendering also does not support MSAA (Multi-Sample Anti-Aliasing). But then again, Unity offers other solutions like FXAA (Fast Approximate Anti-Aliasing) or TAA (Temporal Anti-Aliasing). Another limitation of the deferred renderer is that it does not support vertex lighting, but that is not something we will be using as it is an older technique that looks worse than pixel lighting (see image below for comparison)
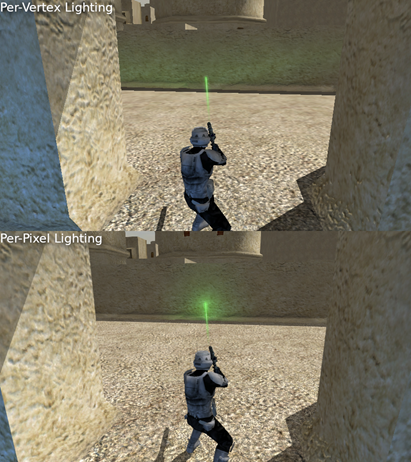
With this in mind we we’re pretty sure that the deferred render path is the render path we needed. We then dived into the Unity documentation to get to know more about the two render paths and to see what Unity themselves might recommend. This dive into the documentation affirmed that we should go with deferred rendering. Deferred rendering does require a “more recent” graphics card with multiple render targets (MRT), a more recent version of the shader model (3.0 or later) and support for depth render textures. Most PC graphics cards made after 2006 support deferred rendering, so this isn’t really an issue but more of a heads-up.
A performance consideration to be made is that the rendering overhead of real-time lights in deferred shading is proportional to the number of pixels illuminated by the light and not dependent on the scene’s complexity. Meaning that lights that don’t illuminate a lot of “pixels on the screen” (the “2D” pixels after the rasterization stage in the graphics pipeline) have only a small impact on performance. One last important thing to note is that baked global illumination set to Shadowmask or Subtractive put extra load on the GPU in the deferred render path. Is this extra load too much, for which we’ll have to switch to the forward render path? Only one way to find out!
Hands-On Research
For our research, we set up a project using the latest version of Unity (2022.2.9f1 as of writing) using the URP. To make the comparison as unbiased as possible, we made one scene in Unity with 64 real-time lights and a some props with a total of 127k triangles. There were three semi-transparent walls placed behind each other with a fire particle system, that ran on the CPU, between each of the walls. This scene would be used to test out all of our previous findings. We downloaded and installed a plugin that monitors and displays our current framerate, average framerate, the 1 percentile and 0.1 percentile.
The findings only confirmed our previous research, the deferred render path is the one we need for our project. We found that there is a big difference in performance between the two render paths, especially with 64 real-time lights. The performance of the deferred renderer is almost double of that of the forward+ renderer in Unity. The forward+ renderer is an extension of the forward render that works around its 9 lights per object limit and rather has a 256 light limit per camera. Besides these findings the semi-transparent walls also looked different between the two render paths, with the specular highlights being much less bright in the deferred renderer vs the forward+ renderer. Below is a comparison of the two renderers.
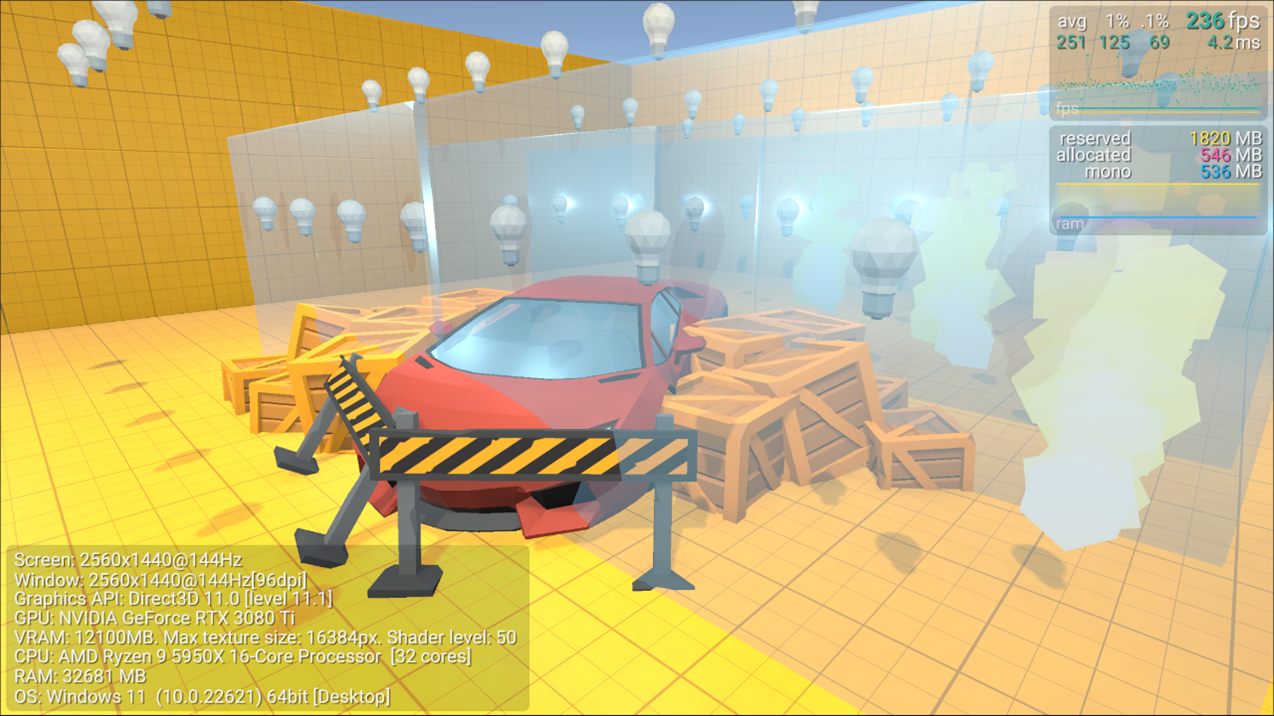
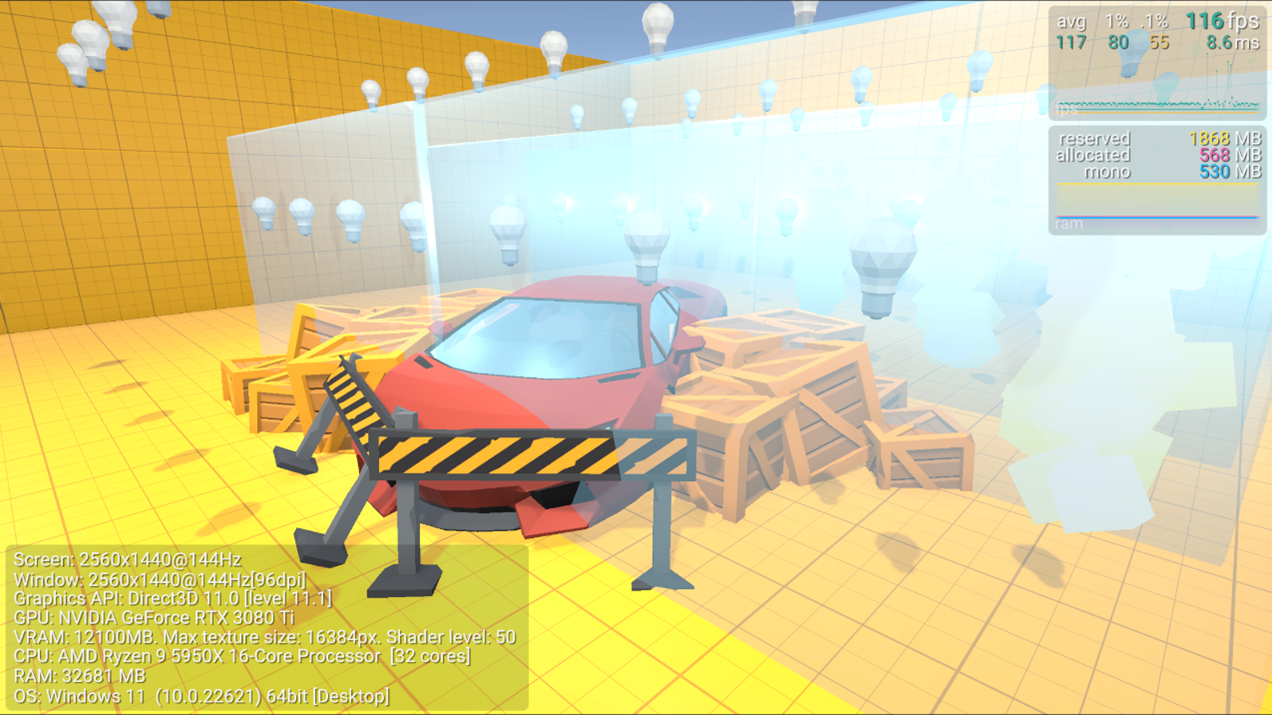
To check if our findings about baked global illumination is putting extra load on the GPU in the deferred rendering path, we baked our scene using 32 of the 64 real-time lights. So we set 32 lights to baked and 32 lights to real-time. Testing out this newly baked scene in both renderers, we found out that the deferred renderer still enjoys a performance increase using baked global illumination using the Shadowmask lighting mode. The deferred rendering was still faster than the forward+ rendering, by quite a bit. Below is a comparison of the scene in both renderers.
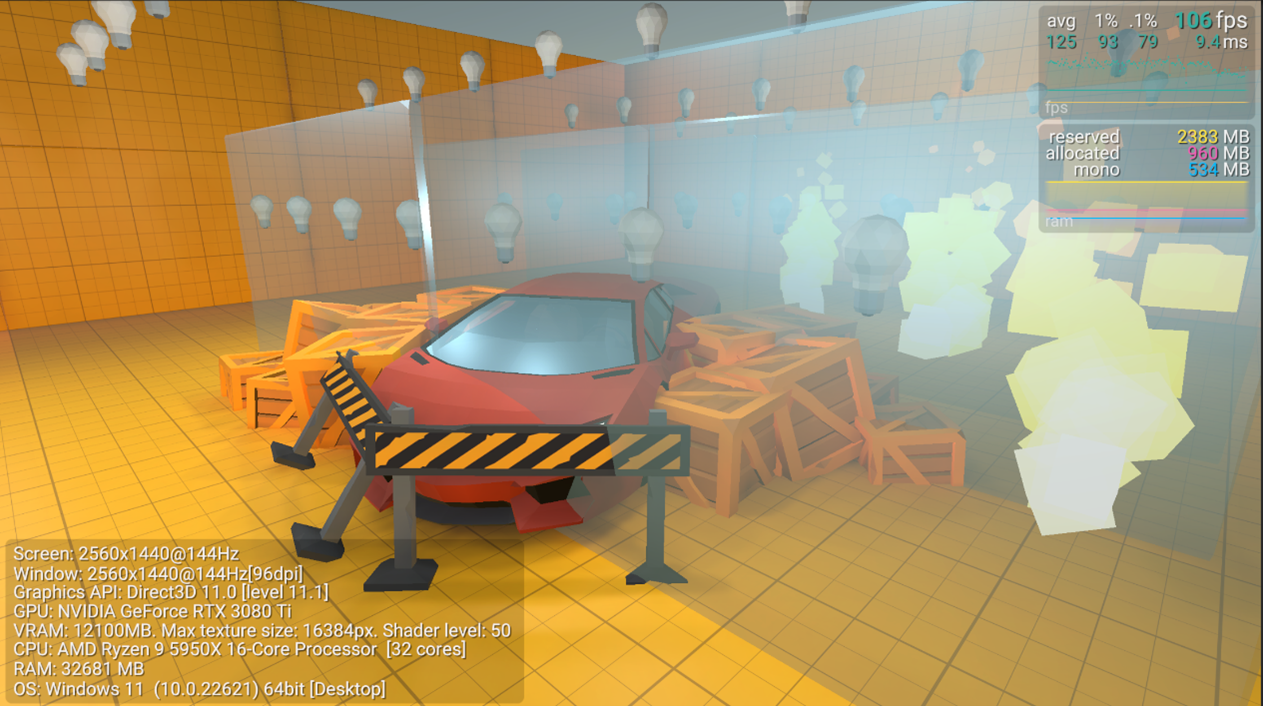
Deferred renderer with baked lights set to Shadowmask lighting mode and 32 real-time lights 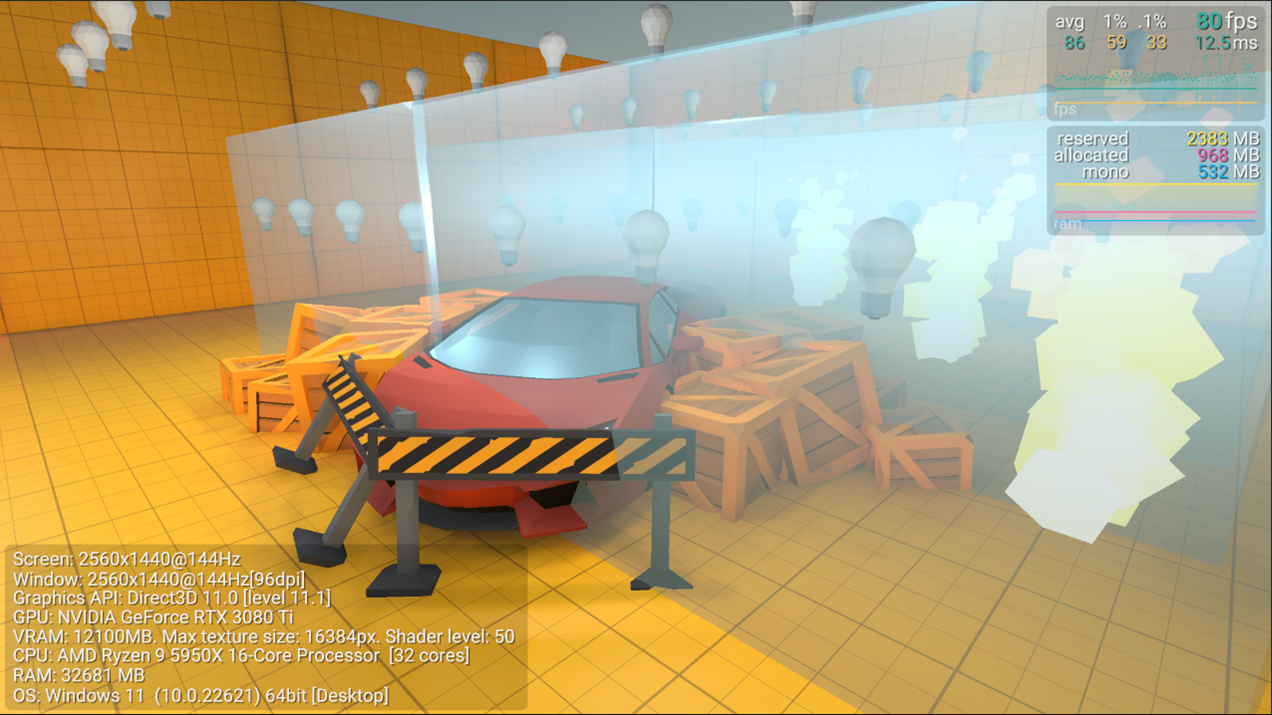
Forward+ renderer with baked lights set to Shadowmask lighting mode and 32 real-time lights
Verdict
So with all this research behind us, we are 99% sure that the deferred render path is the render path we need. It offers superior performance when using more than 8 real-time lights, which is something we will almost certainly have in our scene. The “drawbacks” of the deferred renderer are also much more negligible than the drawbacks that come with the forward+ renderer.
Integrated Development Environment (IDE)
When we both (the programmers) were asking ourselves the question “which IDE are we going to use?”, we both almost immediately defaulted to Microsoft’s Visual Studio since it’s the IDE of choice for all of our courses. Jef, however, has had some previous experience in JetBrains Rider IDE and grew fond of it. Not only is its version of intellisense miles ahead of that of Visual Studio, it also comes with neat integration for Unity, Unreal and Git. With all this he got Jentl, his companion programmer, convinced to use Rider for our upcoming project. That is, until Jef started looking into our version control software of choice, Perforce.
When he was looking into Perforce and setting it up for Unity, it is then that he stumbled upon an article posted by the team behind Perforce. The article was about setting up your work environment and which IDE is best used when working in this environment, and lo and behold, Visual Studio came out on top. In a survey that over 300 in the industry filled in, 68% of them have Visual Studio installed as their trusty IDE, with “only” 20% using Rider. The report contains some other very interesting findings about the current trend in Game Development and technology. Be sure to check it out via the following link: https://www.perforce.com/resources/vcs/game-development-report

If that report was not enough to convince us already, Perforce also recommends using their version control together with Unity and Visual Studio for a smooth and fast workflow. So with al this data, we decided to stick to our ol’ and trusty Visual Studio to write out all our juicy game logic.
Art
Main Overview
The game will be very stylized and it will have a simple design. As references we will look at games with these features, nothing too complex, no very detailed textures or models.
The theme of this game will be ghosts and exorcists in a haunted house. This does not sound super inviting and rather a bit scary. Typical items, environment and characters will be described below.
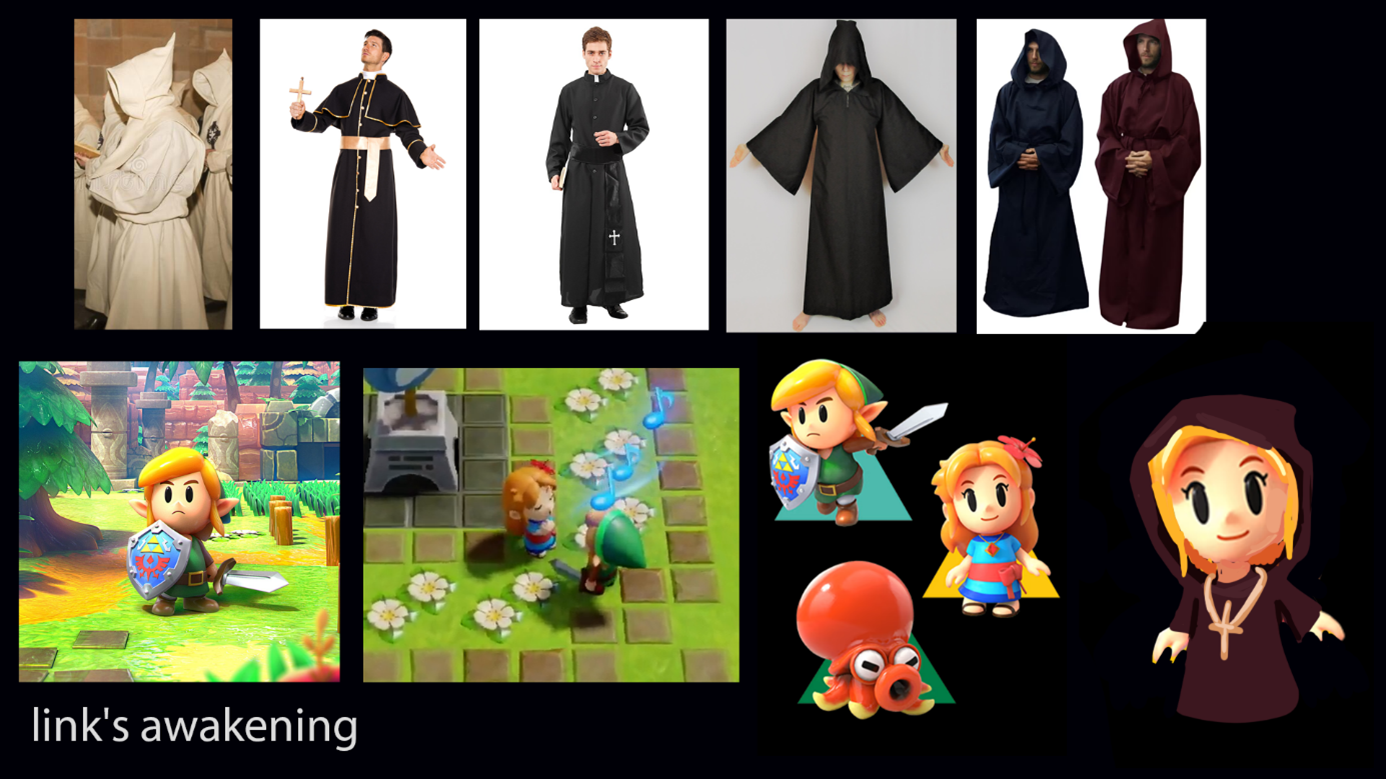
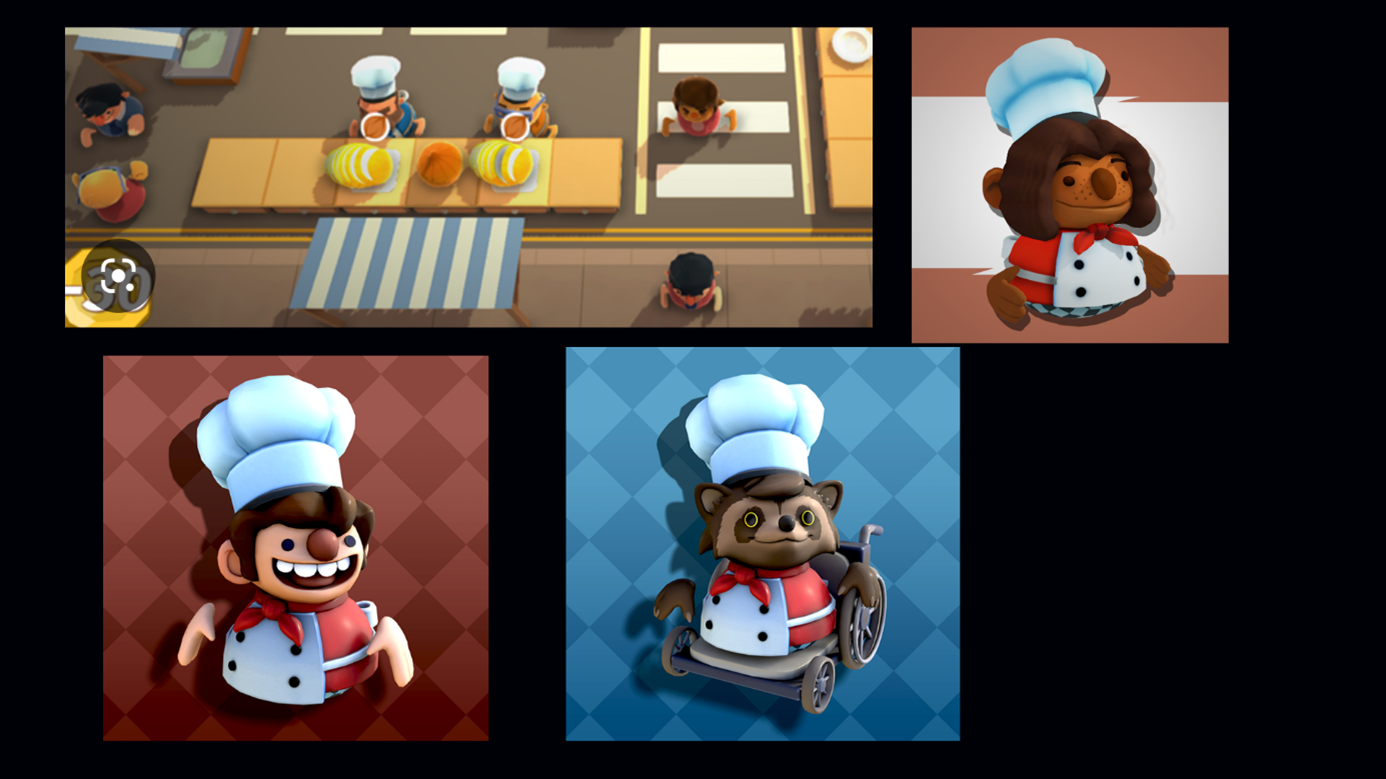
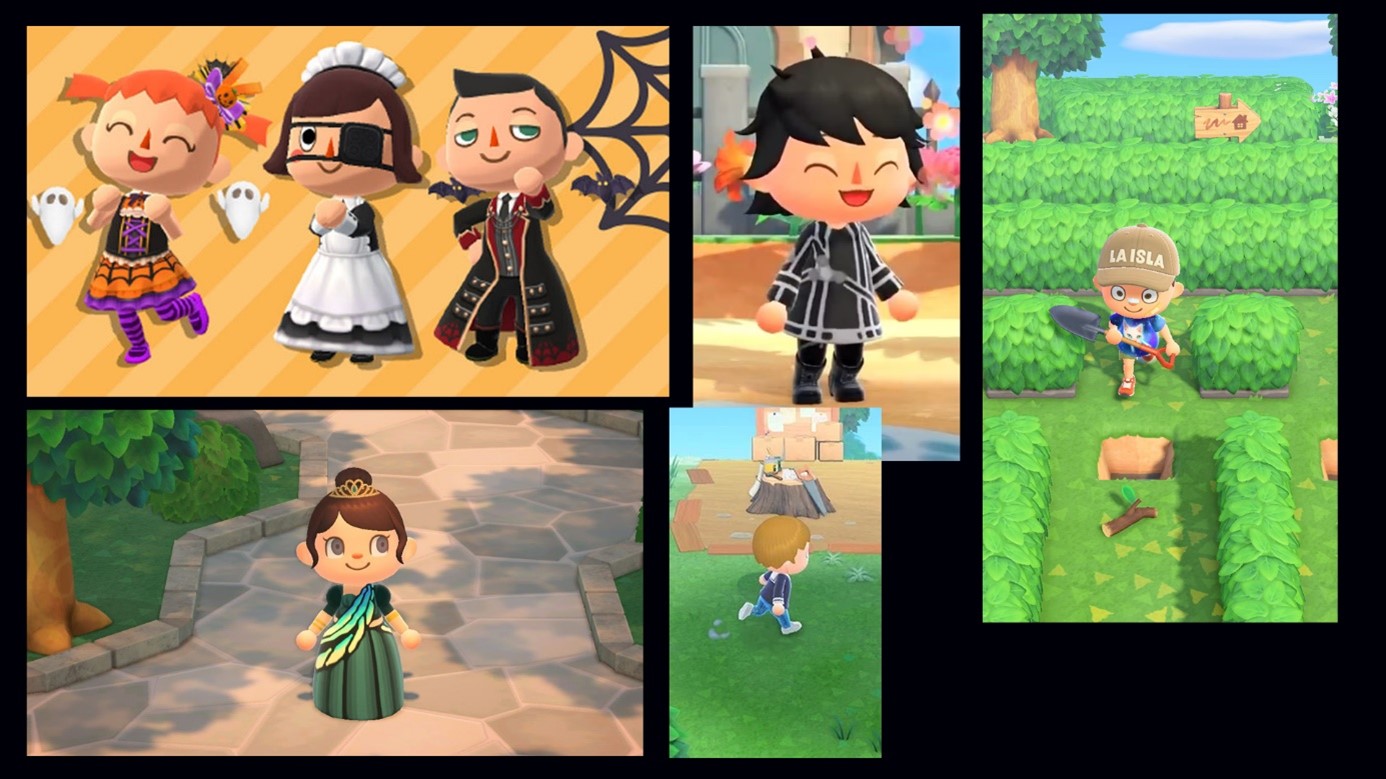
Style wise, we could go for a more round and friendly look. The colours don’t have to very bright to match this, they can be a bit darker to match the theme. We could have candles for light to make it more spooky, but a spooky theme doesn’t mean directly that it all has to look very scary and dangerous either. Some styles that would work with the friendly look would be: Zelda Link’s awakening, Animal Crossing, Overcooked, etc.
On the other hand, you can also make the style a bit more angular, dangerous looking.
Characters
Ghosts
For ghosts, we could go with a different colour of ghost per player, this way it is easy to spot yourself in the game. The colours would be ghost like, not too bright, or saturated. We could make the ghost shape round, the expression can be kind looking or mean looking.
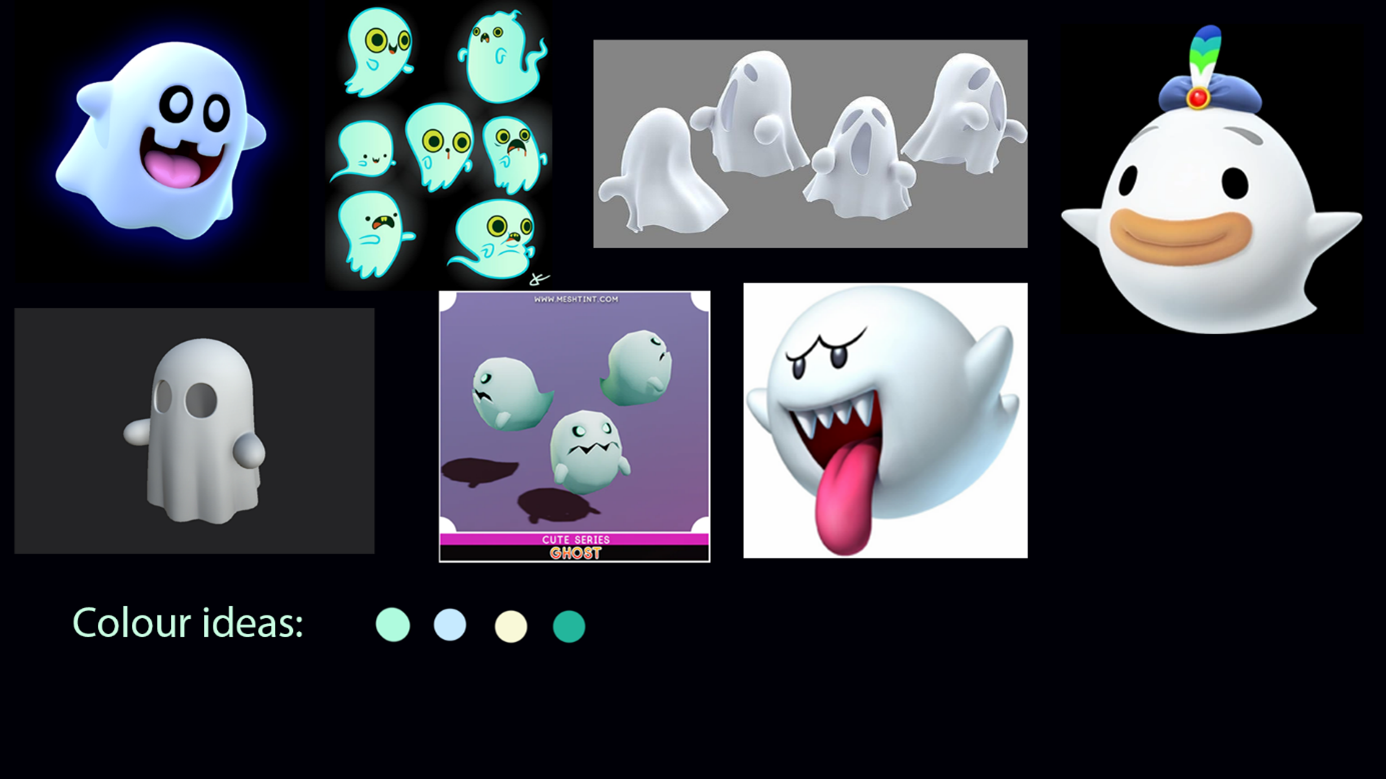
Exorcists
Some of the styles for the overall characters, Link’s awakening:
Overcooked:
Animal Crossing:
Environment
Different room ideas
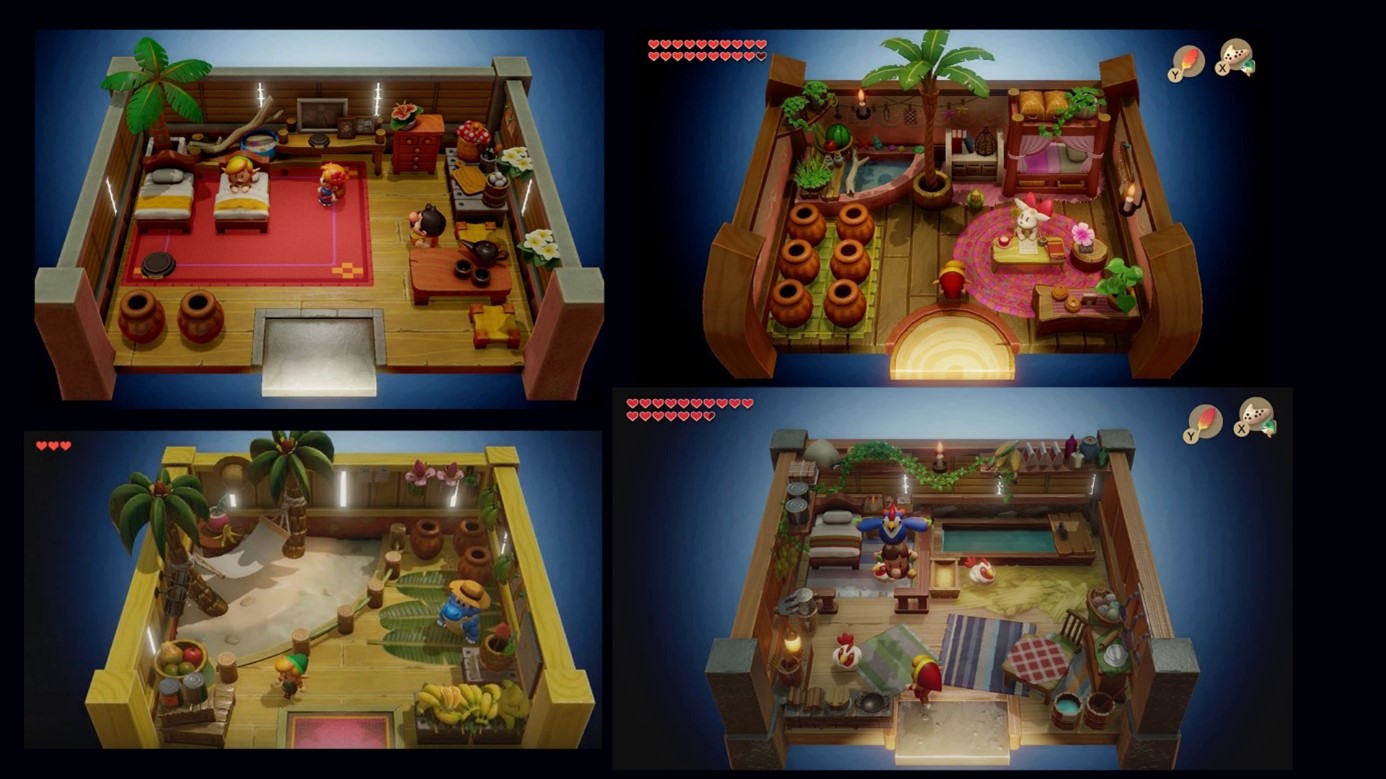
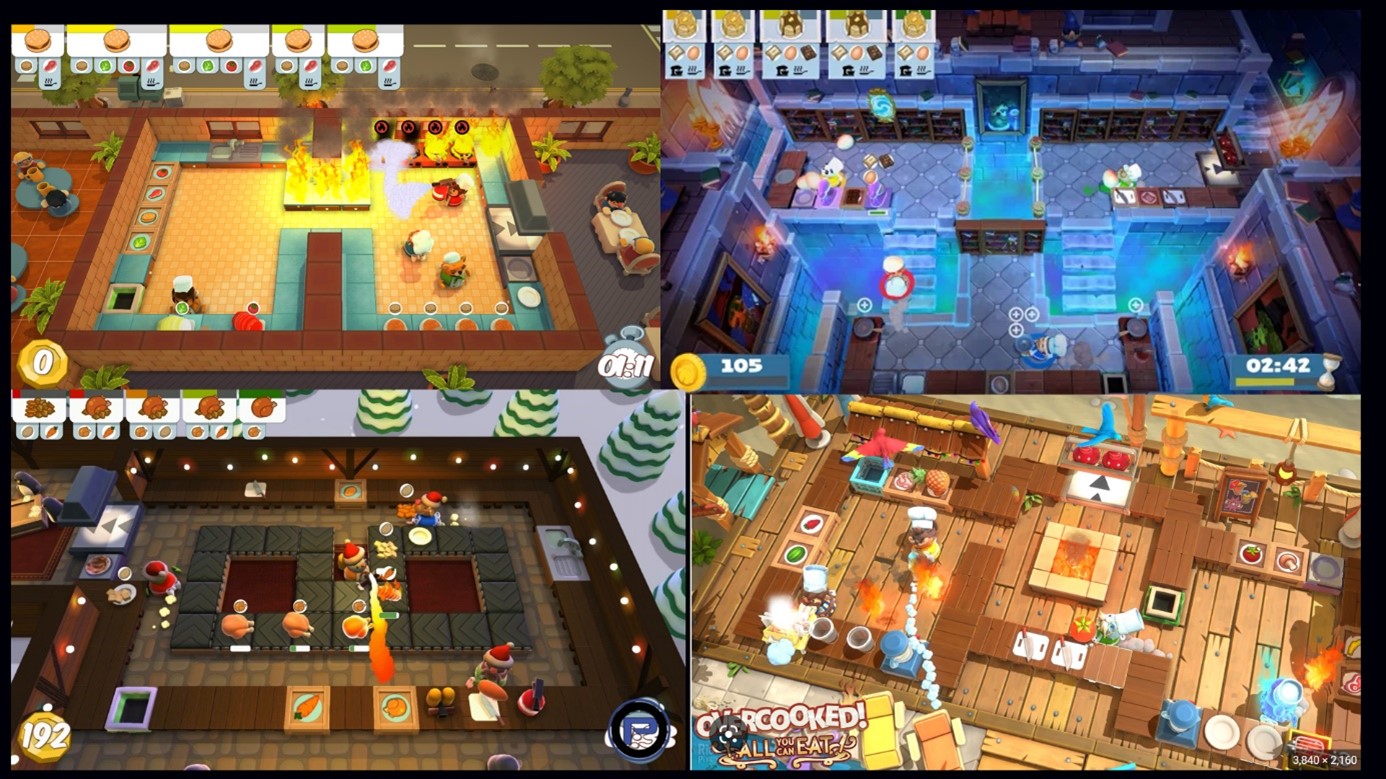
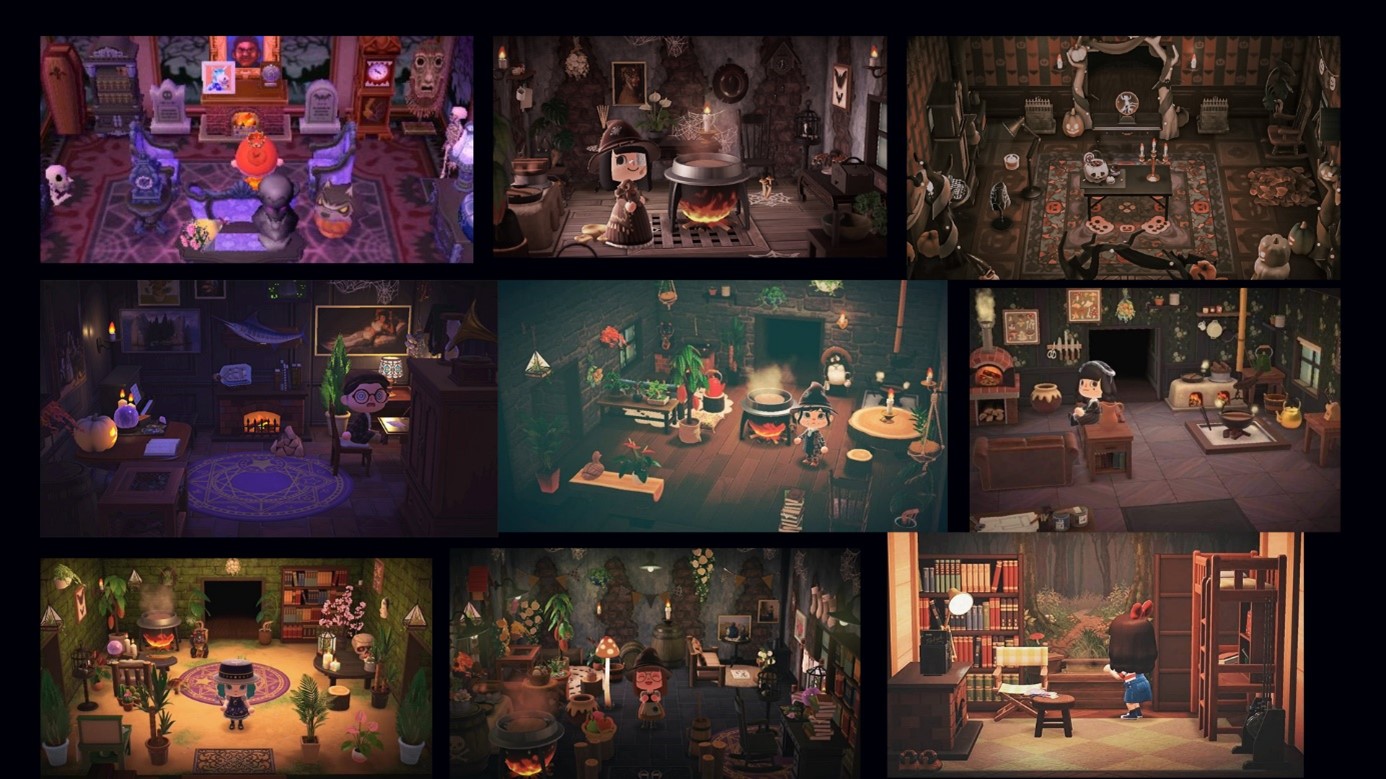
You have different types of rooms in a house each corresponding to their own environment. For example on the first floor we have a kitchen, living room, hallway, toilet, office room, garage, etc. A second floor mostly has bedrooms, music room, toilet, bathroom, etc.
Again we have them in all styles, Link's Awakening:
Overcooked:
Animal Crossing:
Blockouts
One of the artists Gwynne has also already started on some blockouts. This gives us a lay of the land and a good idea and feel of the looks. We have some smaller houses:

And some bigger houses:
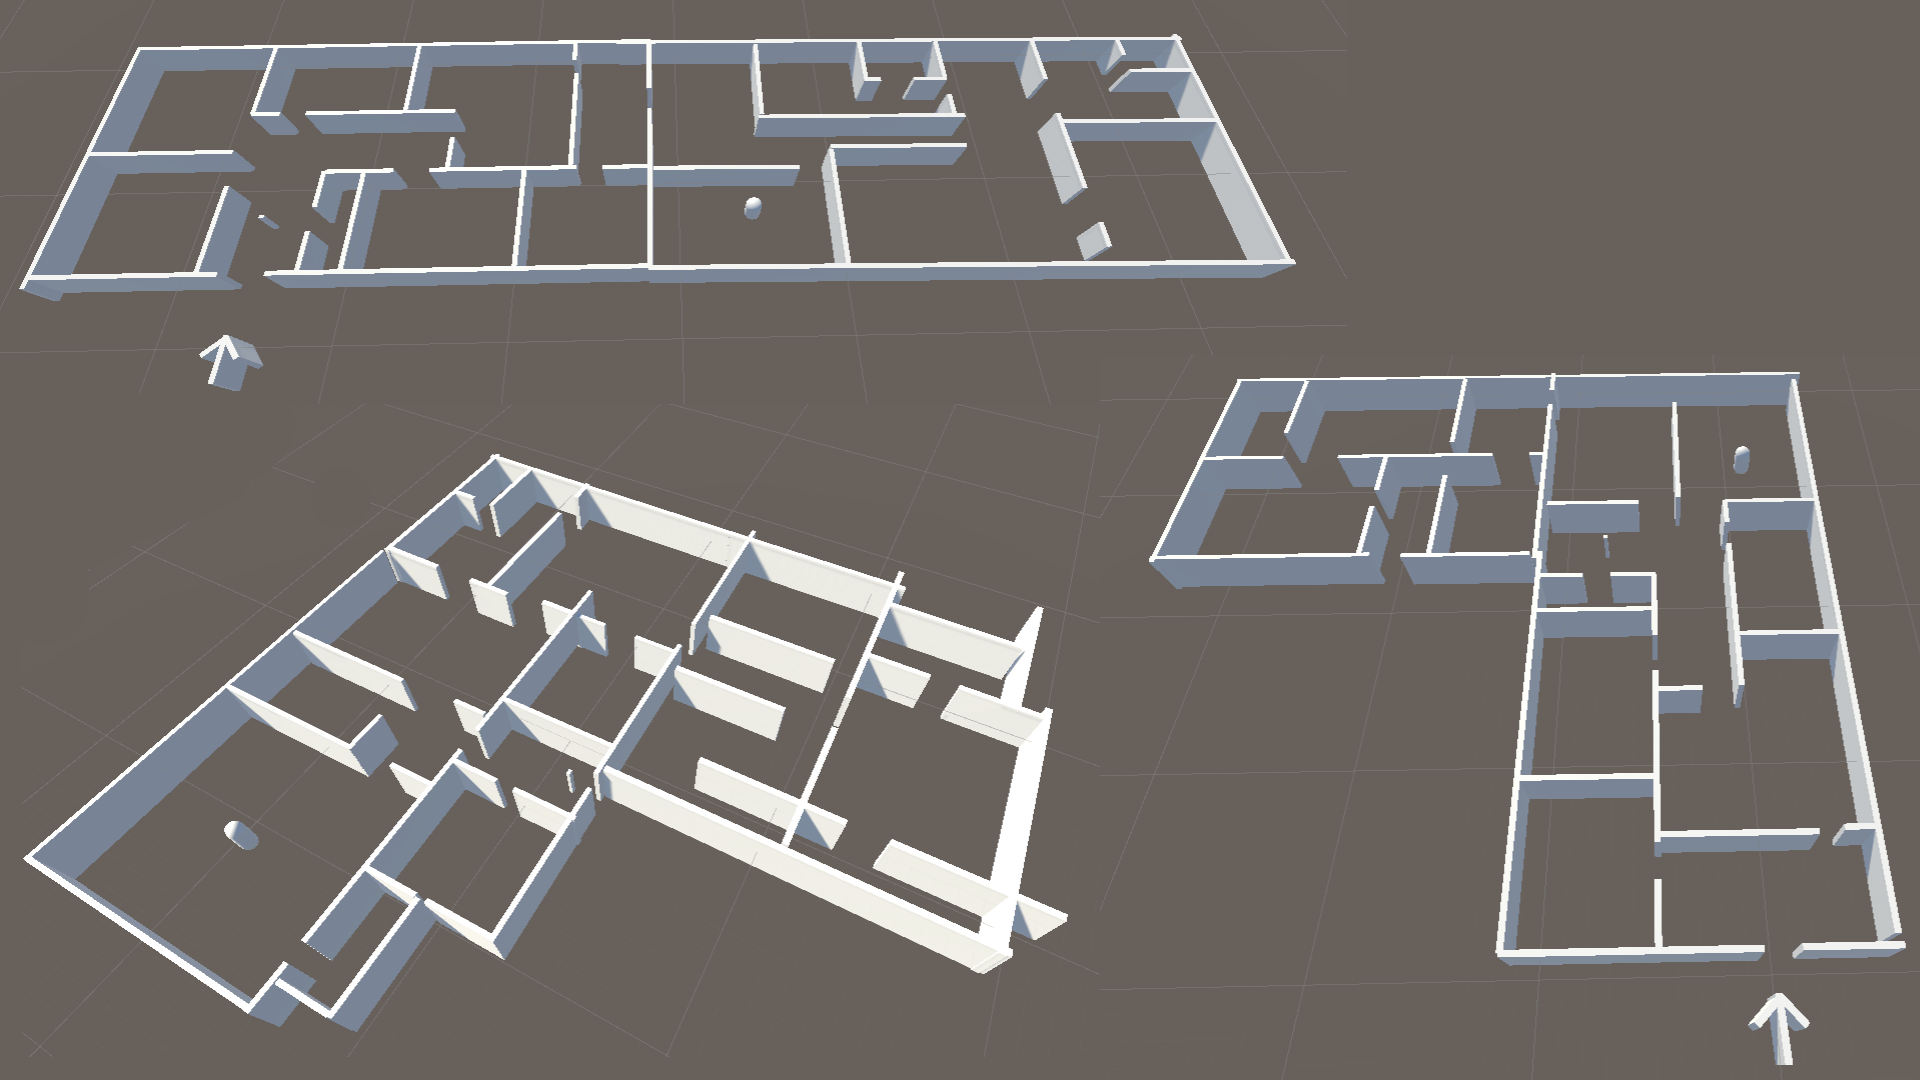
As of this time we do not have a final choice of size. This will be looked further upon as we start more prototyping and start to add more players.
Final Style Choice
When choosing our final style we have to take into consideration our timeframe. Having a very detailed and textured style takes up a lot of time and isn't easy to accomplish. We also have to take in mind that 2-4 players will be looking to the same screen and will be seeing different characters. Therefore having simplistic characters would be easier to spot.
Our choice of preference therefore lies to the style of Overcooked. Overcooked also gives us an advantage that the camera setting almost are identical and this gives us a lot of references to look at.
That's a wrap!
Next week the artists will start working on finalizing the style and documenting it in the art bible. As for the programmers the job will be making some more prototypes and testing out the main mechanics. Until then! :)
Files
Get Spiritual Pursuit
Spiritual Pursuit
A game with exorcists, ghosts, curses, and cleansing rituals!
| Status | Released |
| Authors | SinasOddlySpace, VandorpKe, gwynneo, MemesKeepMeLivin, RainahBraun |
| Genre | Strategy |
| Tags | 3D, Controller, Co-op, Dark, Ghosts, Local Co-Op, Multiplayer, Top-Down, Unity |
More posts
- Devlog 11: The big finale!May 29, 2023
- Devlog 10: PolishMay 23, 2023
- Devlog 9: last week of 2nd Production SprintMay 16, 2023
- Devlog 8: 2nd week of 2nd Production SprintMay 09, 2023
- Devlog 7: 2nd Production SprintMay 02, 2023
- Devlog 6 : Production Sprint Week 3Apr 25, 2023
- Devlog 5: Production Sprint Week2Apr 18, 2023
- Devlog 4: Production Sprint Week 1Mar 27, 2023
- Devlog 3: Final PrototypeMar 20, 2023
- Devlog 2: All adhere the art bible!Mar 13, 2023

Leave a comment
Log in with itch.io to leave a comment.